Portugues Lab Fish Facility – Manual
This manual describes how to use and maintain the fish facility system: Users (everyday use), Admins (data and user management), and Developers (code & server maintenance).
1. User manual
A. Logging in
Open https://fishroom.portugueslab.com/. If you are not logged in, you will be redirected to the login page.
- Your username is created for you by an admin.
- You will receive an email with a temporary password.
- On first login, immediately click “Change password” in the header and choose a new password.
If you forget your password or did not receive the email, contact the lab admin so they can reset your account.
B. Viewing lines and tanks
B1. All lines in the facility
From the dashboard, click “View lines” or go to
/lines/. You will see:
- All active lines in numerical order (L-0001, L-0002, …).
- For admins, retired lines are shown separately at the bottom.
B2. Your lines and tanks
On the Dashboard you see:
- My lines (active) – lines where you are the caretaker.
- My tanks – all tanks that contain lines you are responsible for.
Caretaker initials are generated from your name (e.g. Ruben Portugues → RP) and are stored on each line. Tanks “inherit” this caretaker information from their line.
C. Setting up a cross
C1. Via the “Set up a new cross” button
- On the dashboard, click “🧬 Set up a new cross”.
- You will see the cross form with:
- Date setup – when you set up the cross (defaults to today).
- Male line / Male tank
- Female line / Female tank
- Notes – e.g. “pair cross”, “basket cross”, etc.
-
You can use either:
- Line → Tank: choose a line, then the tank list is filtered to tanks of that line.
- Tank directly: leave line empty and pick any tank directly from the dropdown.
- Click “Set up cross – remember to enter embryo info tomorrow”.
C2. Via a specific tank
When you are on a tank page (e.g. /tanks/T-045/), you can click
“Log a new cross involving this tank”. That pre-fills the
cross form with that tank as the male (or one parent).
C3. Recording embryo outcome
The cross form includes fields for:
- Gave embryos (yes/no)
- Embryo count
You can fill those in immediately or later by editing the cross via the admin interface (if you have access).
Recent crosses appear at the bottom of the dashboard under “Recent crosses”, including date, parents, and caretaker.
D. Using the QR code in the facility
Each tank label includes a QR code that encodes the URL of the tank detail page
(e.g. /tanks/T-045/).
- Open the camera app (or QR scanner) on your phone.
- Point it at the tank’s QR code.
- Open the link – you will be taken to the tank page in the system.
- From there you can:
- Check line, DOB, location, and status.
- Create a new cross involving that tank.
- Download a replacement label PDF if needed.
E. Printing tank labels
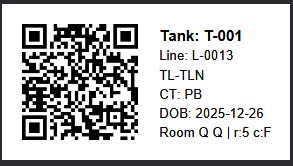
Tank labels are generated as PDFs sized for 2.4" DK tape on the Brother QL‑810W printer. They contain a tall QR code plus six lines of text: tank ID, line ID, common name, caretaker, DOB, and rack/row/column.
- Go to the tank page (
/tanks/T-XXX/). - Click “Download label for this tank”.
- Open the PDF and print to the Brother QL‑810W with 2.4" label tape selected.
- Affix the label to the tank in the facility.
Example label
Below is an example of a printed label as it will appear on the Brother QL-810W:
F. Adding a new line
- On the dashboard, click “➕ Create a new line”.
- Fill in:
- Common name
- Genotype
- Date of birth (DOB) for the founding generation.
- Female parent and male parent if known (only active lines appear in the dropdown).
- Notes (e.g. origin, references, special handling).
-
When you save:
- A new Line ID is generated (L-000X).
- Your caretaker initials are assigned automatically.
- The line is marked as active.
Important: Every line must exist in at least one tank. After creating the line, add a tank for it.
G. Adding a new tank
- On the dashboard, click “➕ Add a new tank”.
-
In the form:
- Select the line that will inhabit the tank.
- Pick a free location (room, rack, row, column).
- Enter DOB/stocking date and number of fish.
- When you save:
- A new tank ID is assigned automatically (T-001, T-002, …).
- The tank appears on the facility map and in exports.
- The tank “inherits” the caretaker from its line.
H. Changing a tank’s location
- Open the tank page for the tank you want to move.
- Click “Move this tank”.
- Select a new free location (the form shows only free positions, plus the current one).
- Save. The tank moves on the facility map, but its line and caretaker stay the same.
I. Viewing a map of the facility
Click “🗺️ View facility map” on the dashboard or go to
/facility-map/. The map shows:
- Each room with its racks.
- Each rack as a grid of rows and columns.
- Each occupied position with the tank ID and line ID.
- Tanks older than the threshold (e.g. 18 months) highlighted as “old”.
J. Submitting an issue / improvement
If you notice a bug, missing feature, or have an idea:
- Click “Issues” in the header.
- Describe the problem or suggestion in the text box.
- Submit. The issue will:
- Be saved in the system.
- Appear on the “Improvements” page, visible to everyone.
- Trigger an email to the facility address so admins/developers are alerted.
- When an admin marks your issue as resolved, you will receive an email notification.
K. Tank-age alerts and email notifications
The system tracks the age of each tank based on its date of birth (DOB) / stocking date. Tanks older than a configured number of months are considered old.
By default, this threshold is 18 months (5 months while troubleshooting), but it may be changed by the facility admin. For example, admins can set the threshold to 12 months, 24 months, etc.
You will see old tanks highlighted:
- On the Dashboard summary (Old tanks (≥ X months))
- On the facility map (old tanks shown in red)
- On old-tank lists and PDFs
In addition, the system sends regular old-tank email alerts when tanks cross this age threshold. These emails go to the facility’s configured alert recipients (such as managers or caretakers). If your tanks become older than X months, they will be included in these alerts.
Because the threshold X is configurable by the admin, always refer to the Dashboard summary (“Old tanks (≥ X months)”) to see the current value used by the system.
2. Admin manual
A. Overview of admin responsibilities
Admins have extra powers beyond regular users:
- Access to the Django admin at
/admin/. - Manage users and their access.
- Manage all lines, tanks, and crosses, including edits and deletions.
- Adjust global facility settings (e.g. old tank threshold and alerts).
- Review and resolve Issues (improvement requests).
- Export data for backup/analysis (CSV + PDF exports from the dashboard).
B. Managing users
B1. Creating a new user
- Go to
/admin/and log in as an admin. - Click “Users” under Authentication and Authorization.
- Click “Add user”.
- Fill in:
- Username – short, consistent ID (e.g.
rp698). - Email – required to send login information.
- First name and last name – used to derive caretaker initials.
- Username – short, consistent ID (e.g.
- Save the user. The system automatically:
- Generates a random temporary password.
- Sends an email with username + temporary password + login instructions to the user.
B2. Staff vs. normal users
In the user’s admin page:
- Staff status – determines whether they can access
/admin/. - Superuser – only for developers or lab PI; gives full access to all admin features.
For most lab members:
- Staff = No, Superuser = No – use only the normal UI.
- For a trusted facility coordinator, you might set Staff = Yes and give access to colony models only.
B3. Resetting a user password
- In
/admin/, open the user. - Click “Change password” at the top of their user page.
- Set a new password or create a temporary one and inform the user.
- Ask them to log in and use the “Change password” link in the header to choose a new personal password.
C. Managing lines
C1. Creating and editing lines
Admins can:
- Create lines via the normal “Create a new line” form (recommended for consistency).
- Or manage them directly at
/admin/colony/line/.
In the admin, you can adjust:
- Common name, Genotype, DOB, parents.
- Caretaker initials – reassign responsibility if someone leaves or joins.
- Retired flag – mark lines as no longer present in the facility.
- Notes – any extra info (publications, quirks, etc.).
C2. Retiring lines
When a line is retired:
- Set retired = true in the admin.
- The line disappears from normal user lists, but remains available under “retired lines” and in exports.
- Existing tanks should either be “final” (no longer maintained) or cleared from the facility.
Retiring does not delete historical data (crosses, PDFs, CSV entries).
D. Managing tanks
D1. Creating tanks
Preferred method: through the normal UI (“Add a new tank” from the dashboard). This ensures:
- Automatic tank ID generation (T-XXX).
- Location is validated (no duplicates).
- Caretaker information is inherited from the line.
Advanced: in /admin/colony/tank/, you can create/edit tanks directly, but be careful not to reuse tank IDs or double-allocate locations.
D2. Moving tanks
Use the “Move this tank” view instead of changing fields manually whenever possible. It enforces:
- No overlapping of tanks in the same position.
- The facility map remains accurate.
D3. Old tanks
Tanks older than the configured threshold (e.g. 18 months) are considered “old”. Admin tools:
- Dashboard: count and preview of old tanks.
- “View all old tanks”: full list with links to tank pages.
- Old tanks PDF: a downloadable report of all old tanks.
E. Managing crosses
Crosses can be entered by users via the setup form or tank pages. Admins can:
- View and edit all crosses in
/admin/colony/cross/. - Correct mistakes (wrong tank, wrong date, etc.).
- Fill in or adjust gave_embryos and embryo_count.
- Review notes and caretaker initials.
Cross data can be exported as CSV from the dashboard (under Exports).
F. Facility settings & email alerts
F1. Threshold for “old” tanks
Admins can adjust the age threshold (in months) that defines an “old” tank (used in the dashboard, map highlighting, and old-tank reports).
- Go to
/admin/colony/facilitysettings/. - Edit the singleton settings object.
- Set threshold_months (e.g. 18).
- Save; the change is applied everywhere that uses old-tank logic.
F2. Weekly email alerts
A scheduled job (cron) calls a management command that emails a summary of old tanks to configured recipients. You can:
- Toggle email alerts on/off via the settings object (if exposed).
- Ask the developer to adjust recipients or schedule if needed.
G. Issues & improvements workflow
Users submit issues via the Issues link. As an admin, you should:
- Check the Improvements page regularly to see open issues.
- In
/admin/colony/issue/, review issue details and user. -
When an issue has been handled, use the admin action
“Mark selected issues as resolved”.
This will:
- Mark the issue as resolved in the database.
- Send an email to the reporting user informing them it is resolved.
H. Data exports & reporting
From the dashboard (as admin) you have quick export links:
- Lines CSV – all lines (active + retired).
- Tanks CSV – all tanks, including room/rack/row/column.
- Crosses CSV – all crosses with key fields.
- Lines PDF – formatted summary of active lines.
- Retired lines PDF – summary of retired lines.
- Old tanks PDF – all tanks older than the threshold.
Use these exports for backups, reporting, or sharing with facility managers.
3. Developer manual
A. Project structure
The project is a standard Django project with one main app:
- Project:
fishfacility/(settings, root URLs, WSGI). - App:
colony/– all core models, views, templates. - Templates:
colony/templates/colony/(dashboard, lines, tanks, crosses, manual, etc.). - Static files: collected into
staticfiles/on the server viacollectstatic. - Management commands: live under
colony/management/commands/(e.g. weekly alert commands).
B. Local development environment
- Clone the repository to your laptop.
- Create a virtual environment:
python -m venv venv source venv/bin/activate # or venv\Scripts\activate on Windows pip install -r requirements.txt - Create a local
.envor local settings for DB and email (PostgreSQL recommended to match production). - Run migrations:
python manage.py migrate - Create a superuser:
python manage.py createsuperuser - Run the development server:
python manage.py runserver - Access the site at
http://127.0.0.1:8000/.
C. Deployment on the VPS
Production runs on an AlmaLinux VPS with:
- Gunicorn application server (systemd service
fishfacility). - nginx reverse proxy (serves HTTPS, static files).
- PostgreSQL database (
fishfacilityDB).
C1. Typical update workflow
- SSH into the VPS.
-
Pull latest code:
cd /var/www/fishfacility git pull -
Activate venv and run checks/migrations:
source venv/bin/activate python manage.py check python manage.py migrate # if models changed -
Collect static files if needed:
python manage.py collectstatic -
Restart services:
sudo systemctl restart fishfacility sudo systemctl restart nginx - Verify the site at
https://fishroom.portugueslab.com/.
D. Database & backups
The site uses PostgreSQL in production. Best practices:
- Use
pg_dumpto make regular backups of thefishfacilitydatabase. - Store backups securely (off the VPS).
- Before major schema changes, take a fresh backup.
- For local testing with real-ish data, restore a scrubbed copy of production to your dev DB.
E. Scheduled tasks (cron)
Some periodic tasks (e.g. weekly old-tank alerts) are run via cron:
- Crontab entries call management commands such as
python manage.py send_old_tank_alertsinside the virtualenv. - If alerts stop working, check:
- Crontab entries (
crontab -efor the appropriate user). - Django logs and mail logs.
- Crontab entries (
F. Adding new features
- Model changes:
- Add fields or models in
colony/models.py. - Run
python manage.py makemigrationsandpython manage.py migrate.
- Add fields or models in
- Views:
- Add or update view functions in
colony/views.py. - Wire them up in
fishfacility/urls.pyand/orcolony/urls.pyif you have an app-level router.
- Add or update view functions in
- Templates:
- Create or modify HTML files under
colony/templates/colony/. - Re-use the existing styling and base layout (
base.html).
- Create or modify HTML files under
- Forms:
- Use Django
ModelFormclasses defined inviews.pyor a dedicatedforms.py.
- Use Django
- Testing locally:
- Use
python manage.py testfor automated tests. - Do manual testing on
runserverbefore deploying.
- Use
G. Troubleshooting & logs
Useful commands on the VPS:
-
Check Gunicorn service:
sudo systemctl status fishfacility -
View recent application logs:
sudo journalctl -u fishfacility.service -n 40 --no-pager -
Check nginx:
sudo systemctl status nginx -
Run Django checks:
source venv/bin/activate
python manage.py check
For 500 errors, temporarily set DEBUG = True in settings
(locally or briefly on the VPS), reload, examine the error page, and then
switch back to DEBUG = False afterwards.